Developing an application
In this chapter we will develop a small application: an offline transfer transactions signer for the test network. It will consist of a desktop application built on Electron, that will let you generate and a transaction without network connection. It is a way to secure a private key from being compromised. Adapting the applications to work on the main net is trivial (we will underline what minor changes are needed).
When the signed transaction has been generated, it needs to be broadcasted to the network. That will be done from an Android application. The Android application will scan a QR-code displayed by the desktop application, and will send the encoded transaction to the NEM network.
Security consideration
It is interesting to note that, if a multisig transaction is generated by the desktop app and another co-signatory is required to sign the transaction for it to go through, and the co-signatory signing the transaction has no fund, the user can use this application without the need of trusting the developer of the application.
As another co-signatory needs to sign the transaction, you/he/she can check that the broadcated transaction is what was meant. Even if the desktop application were infected with malware, it wouldn’t be able to fraudulously transfer funds. And as the Android application is simply a broadcaster of the scanned transaction, it doesn’t and can’t compromise the transfer of funds.
Electron Offline signer
To develop our desktop offline signer, we will use the electron-quick-start as a base. We will follow their instructions to install it:
# Clone this repository
git clone https://github.com/electron/electron-quick-start
# Go into the repository
cd electron-quick-start
# Install dependencies
npm install
# Run the app
npm start
If all went well, the last step opens an empty window. This is the base application we will build on.
Dependencies
We first add our dependencies: nem-library, rxjs (for nem-library) and qrcode (to display the transaction as a qrcode).
You add them in package.json, just after the devDependencies entry, like this:
  "devDependencies": {
    "electron": "~1.7.8"
  },
  "dependencies": {
    "nem-library": "~0.10.0",
    "rxjs": "~5.5.0",
    "qrcode": "~0.9.0"
   }
You can see the diff of this commit on Github.
Now run the command
npm install
to install all new dependencies.
Window content
We then edit the index.html file. This is the content of the application’s window. We need to add input fields to get the data required to
instanciate a transaction. These are:
- the signer’s private key
- the recipient of the transfer
- the amount of XEMs transferred
- the message of the transaction
- to be able to sign multisig transactions, we will also include a field for the multisig account’s public key
Edit the index.html file. You can remove everything inside the <body> tag, except for the <script> tag, which
should be left in place, at the bottom.
In the body tag, we add this old school, table-based, HTML:
<table>
<tr><td>signer private key:</td><td><input type="text" id="pk" size="64"/></td></tr>
<tr><td>recipient:</td><td><input type="text" id="recipient" size="64"/></td></tr>
<tr><td>amount:</td><td><input type="text" id="amount"</td></tr>
<tr><td>message:</td><td>
    <textarea id="msg"></textarea>
</td></tr>
<tr><td>Multisig public key:</td><td><input type="text" id="msig_pubkey" size="64"/></td></tr>
<tr><td><button id="send">SEND</button></td></td></tr>
</table>
With this information provided, we will generated the transfer transaction, sign it with the private key provided, and
serialise it to be broadcasted to the network. This JSON serialised transaction will then be displayed as text and as
a QR code. The HTML to display both is a div to display the JSON, and a canvas to display the QR-code:
<div style="width:100%;">
    <div id="result" style="width:75%;word-wrap:break-word;">
    </div>
    <canvas id="canvas">
    </canvas>
</div>
You can see the diff of this commit on Github. This results in this window content:
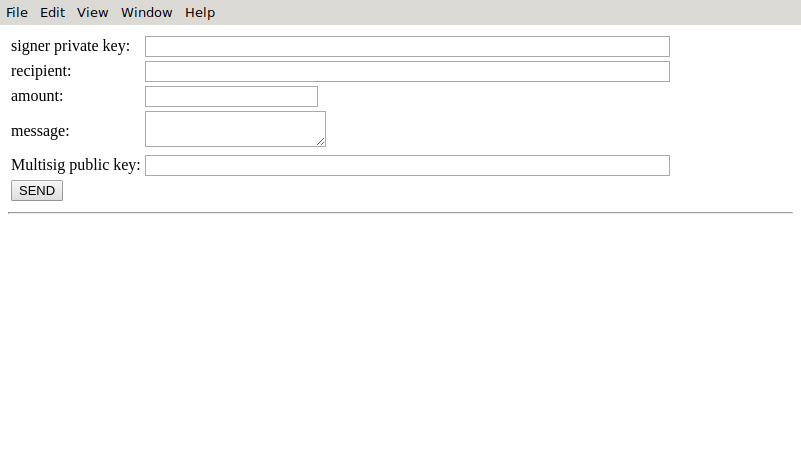
Offline Signer Window
And this is what needs to be tweaked in the application’s window content. You
can of course further change the content of the index.html file to better
suit your needs and taste. We will however focus on the code needed to make this app work.
Code
We will start by removing the menu, which we don’t use.
This is done by editing the file main.js and adding the line
mainWindow.setMenu(null);
right after the initialisation of the main window in the function createWindow.
You can see the diff of this commit on Github.
It is also in main.js that you can activate the developer tools, which are
invaluable when you want to debug your application. To have the developers tools
active, just be sure that this line is not commented:
mainWindow.webContents.openDevTools()
Here is a screenshot of our app with the dev tool opened:
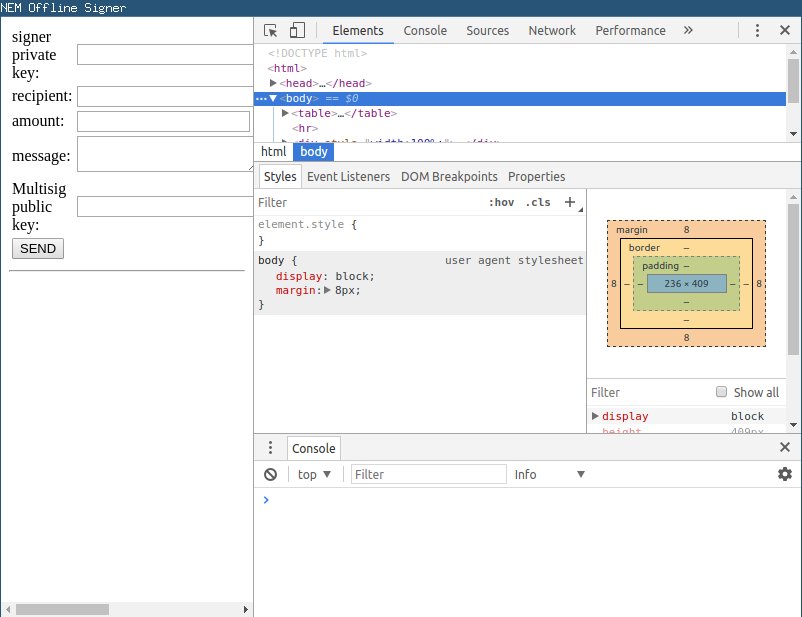
Developer tools
But the bulk of our code is in the file rendered.js.
We start by requiring all dependencies:
const $ = require('jquery');
const nemLibrary = require("nem-library");
const NEMLibrary = nemLibrary.NEMLibrary,
    Address = nemLibrary.Address,
    NetworkTypes = nemLibrary.NetworkTypes,
    TimeWindow = nemLibrary.TimeWindow,
    TransferTransaction = nemLibrary.TransferTransaction,
    MultisigTransaction = nemLibrary.MultisigTransaction,
    TransactionHttp = nemLibrary.TransactionHttp,
    XEM = nemLibrary.XEM,
    EmptyMessage = nemLibrary.EmptyMessage,
    Account = nemLibrary.Account,
    PublicAccount = nemLibrary.PublicAccount,
    PlainMessage = nemLibrary.PlainMessage;
const QRCode = require('qrcode');
We will use jquery in our code, to access elements of the interface we defined
in index.html, and all other lines are nem-library elements we will use.
The first this with nem-library is to bootstrap the environment for the network we will use:
NEMLibrary.bootstrap(NetworkTypes.TEST_NET);
In our case, it will always be the testnet, but should you want to work on the mainnet, this is the only line you would change. A final application would probably display a dropdown list or a radio button to select the network for which to generate the transaction.
We can now write the code to generate the signed transaction and display it as string and qr-code.
We will put this code in the function computeSignedTransaction.
We start by extracting values entered by the user:
        var privateKey = $("#pk").val();
        var recipient =  $("#recipient").val();
        var amount =  $("#amount").val();
        var message = $("#msg").val();
        var msig_pubkey = $("#msig_pubkey").val();
With this info, we can create the transfer transaction:
       let transferTransaction = TransferTransaction.create(
           TimeWindow.createWithDeadline(),
           new Address(recipient),
           new XEM(amount),
           PlainMessage.create(message)
       );
We wanted to also support initiating multisig transactions. With nem library, handling a multisig transaction is just a question of wrapping the transfer transaction with a MultisigTransaction. We will do this only if a public key of the multisig account is provided, resuting in this code:
       // tx will be the transaction signed.
       // if multisig, it is reassigned below
       let tx = transferTransaction;

       // if we have a public key, create a multisig transaction
       if (msig_pubkey!="") {
               tx = MultisigTransaction.create(
                   TimeWindow.createWithDeadline(),
                   transferTransaction,
                   PublicAccount.createWithPublicKey(msig_pubkey)
               );
       }
We can then sign the transaction with the account for which we received the private key from the user. We immediately stringify the JSON of the signed transaction:
       let account = Account.createWithPrivateKey(privateKey);
       let signedTransaction = account.signTransaction(tx);
       let text=JSON.stringify(signedTransaction);
Now we have the text to display. We set the transaction text ad the content of the div with id result:
$("#result").html(text);
and we display it as qrcode:
       var canvas = document.getElementById('canvas')

       QRCode.toCanvas(canvas,text, function (error) {
         if (error) console.error(error)
       })
The only thing left to do is attaching our function to the click of button send:
$("#send").on('click', computeSignedTransaction);
That’s really all there is.
You can see the diff of this commit on Github.
Here is an example of a signed transaction:
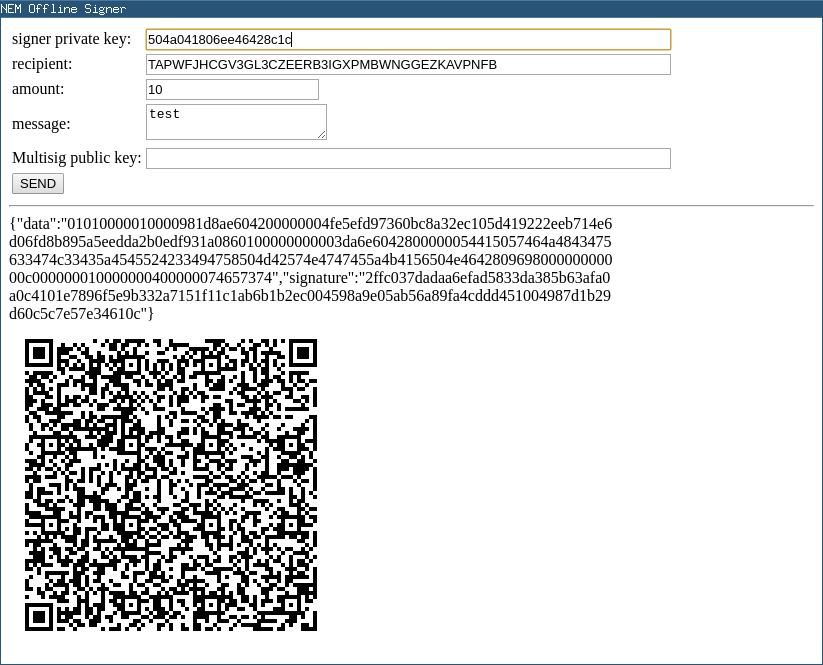
Offline Signer Result
Single file offline signer
If using electron might bring some advantages when the application evolves, in the current state the added value of using the Electron platform is small. Couldn’t we make it a single html file to be downloaded and opened in the browser? The answer is yes, let’s see how we can do it!
The first tool we will use is Browserify, which
lets you use the node’s require in the browser. From its own description:
browserify will recursively analyze all the require() calls in your app in order to build a bundle you can serve up to the browser in a single <script> tag
This leads to a 5MB bundle that we can bring down to 3.3MB by minifying the javascript file.
Once we have the javascript, we can include it in the index.html file as the content of the script tag.
There is not a lot of complexity in these steps, but it is cumbersome and error-prone, so we will automate it.
We will use Grunt as our automation tool.
The steps to automate are:
- bundle all modules used in one javascript file. This is done with browserify.
- minify the javascript file, with uglify
- include the javascript in the index.html file, which is supported by grunt-combine.
Let’s first update the devDependencies to this:
  "devDependencies": {
    "grunt": "~0.4.1",
    "grunt-combine": "~0.8.3",
    "grunt-browserify": "5.2.0",
    "grunt-exec": "3.0.0",
    "uglify-js":"3.1.7",
    "uglify-js-es6":"2.8.9",
    "browserify": "14.5.0"
  }
The Gruntfile has this format:
var packageObject = require('./package.json');

module.exports = function (grunt) {
        // Project configuration.
        grunt.initConfig({
                pkg: grunt.file.readJSON('package.json'),
                module1: {
                        step: {
                                option: "value",...
                        }

                }, ...
        });

        grunt.file.defaultEncoding = 'utf-8';
        grunt.loadNpmTasks("plugin");
        grunt.registerTask("default", ["module1",...]);
};
Step 1
The browserify task is
browserify: {
                scripts: {
                        src: "src/renderer.js",
                        dest: "tmp/renderer.browserified.js"
                }
            }
It requires the plugin grunt-browserify, hence we add it to the bottom of the Gruntfile:
grunt.loadNpmTasks('grunt-browserify');
This will run the browserify command on the file src/renderer.js and generate the file tmp/renderer.browserified.js
Step 2
To minimize the javascript, we use uglify, but we need it to support the ES6 syntax. That’s why we added both uglify-js
and uglify-js-es6 to the dev dependencies. And it is why we don’t use the grunt plugin for uglify, as the released version doesn’t yest
support ES6 syntax. We need to specify the command to run. This is done with
exec: {
        uglify: 'uglifyjs tmp/renderer.browserified.js > tmp/renderer.uglified.js'
}
and including the needed plugin:
grunt.loadNpmTasks('grunt-exec');
Step 3
Finally, we can integrate the javascript file in the html file with the combine functionality of Grunt.
This functionality is simply replacing tokens in a file by the content of another file. To make it work,
we edit the index.html file and put the token //bundle.js as somle content of the script tag:
<script type="text/javascript">
//bundle.js
</script>
We then define the combine task to replace the token bundle.js but the content of the minified file:
combine: {
        single: {
                input: "src/index.html",
                output: "dist/offline_signer.html",
                tokens: [
                        { token: "//bundle.js", file: "./tmp/renderer.uglified.js" },
                ]
        }
}
As for other steps, we include the combine plugin:
grunt.loadNpmTasks("grunt-combine");
The complete Gruntfile is available on github.
The complete code is available unde the directory files/single_file_signer of this repository.
The HTML file built is also in the repository at files/single_file_signer/dist/offline_signer.html. You can also open it in your browser as served from this website.
To build the single file NEM transaction signer, simply go in that directory and do
git clone https://github.com/rb2nem/nem-dev-guide.git
cd files/single_file_signer
npm install
grunt
Open the file dist/offline_signer.html, and you have the same functionality as in the Electron application.
Mobile transaction broadcaster
Now that we have the signed transaction, we need to broadcast it to the network. This is done by sending a POST request to a NIS
and path /transaction/announce with the transaction as payload. The application hence just has to scan the QR-code, and
send a POST request to a NIS. We will do it on Android, and we will base our app on the BarcodeReaderSample
of Github user varvet. This example application is under the MIT license, making is a good start for your own applications.
As this application only just scans a value that it then sends in a POST request, developing a similar solution for IOS should require the same amount of effort.
The BarcodeReaderSample only scans the code, but we need to send it in an HTTP POST request. The first thing to do is enable our application
to access the network. This is done by adding the following line in app/src/main/AndroidManifest.xml:
<uses-permission android:name="android.permission.INTERNET"/>
An attention point for Android is that no network operation is accepted on the main thread. You need to place your network accessing code in an AsyncTask, running its code in background without requiring you to manage threads.
We define our AsyncTask in app/src/main/java/com/varvet/barcodereadersample/AnnounceTransactionTask.java.
We will pass 2 parameters to the AsyncTask: - the URL to which we want to post the transaction - the serialised transaction we just scanned
These parameters are stored in variables url and tx respectively:
        URL url = new URL(params[0]);
        String tx= params[1];
This is not an Android development tutorial, so we won’t detail the usage of
the Android development and debugging tools. You still might be interested to know
we used Android Studio for this code, and that the calls to android.util.Log.i
log the string at the info level, which are accessible in Android Studio when running
the app on the phone over USB.
Sending the HTTP POST request with the transaction as payload is done with this code:
        HttpURLConnection conn = (HttpURLConnection) url.openConnection();

        conn.setDoOutput(true);
        conn.setChunkedStreamingMode(0);
        conn.setRequestProperty("Content-Type", "application/json; charset=UTF-8");

        OutputStream stream = new java.io.BufferedOutputStream(conn.getOutputStream());
        OutputStreamWriter wr = new OutputStreamWriter(stream);
        wr.write(postData);
We can then look at the result and the response we get from the server:
int status = conn.getResponseCode();
According to the result, we need to read the input stream in case of succes, or the error stream otherwise:
        java.io.InputStream in;
        if(status >= HttpURLConnection.HTTP_BAD_REQUEST)
            in = conn.getErrorStream();
        else
            in = conn.getInputStream();

        BufferedReader reader = new BufferedReader(new InputStreamReader(in));
We can then read the response, and close the stream reader:
        StringBuilder sb = new StringBuilder();
        String line = null;

        // Read Server Response
        while ((line = reader.readLine()) != null) {
            // Append server response in string
            sb.append(line + "\n");
        }


        String text = sb.toString();
        reader.close();
This response can then be displayed to the user, or logged. We don’t do that in this example.
We still need to close the connection though:
conn.disconnect();
Now we need to call this AsyncTask from the main activity of the appl which
is defined in app/src/main/java/com/varvet/barcodereadersample/MainActivity.java.
We modify the code to store the scanned value in a String instance:
String tx = barcode.displayValue;
and then we call our AsyncTask:
new AnnounceTransactionTask().execute("http://104.128.226.60:7890/transaction/announce", tx);
We hardcode the server to a testnet NIS. This could be a setting of the app. During the development of this example, the NIS url was set to the IP address of the host running the devguide docker containers. This allowed to debug the POST resquest sent.
You can find all the changes applied to the base QR code scanner application in this commi.
A similar application we developed by github user Antownee. It also has a signer and a multi-platform broadcaster. You might want to take a look at his code too, as well as the accompanying blog post.